Free background from VintageMadeForYou

02 March 2014

Keurig k cup gift box

I saw this on the internet, but there were no directions.  Never fear, I can figure it out.  I am going to do the best I can with directions.  The problem will be that I do NOT like to measure things, I rarely do, so often measurements are an afterthought.  I apologize for that, I just would rather eyeball it (I'm pretty accurate there, then measure).


First I made my triangle base. I did this by placing six k-cups in a triangle shape and then drew around it.  The top line is about 8 inches, the side 8.5, I warned you.


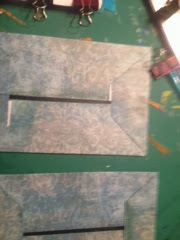
Next, I flipped the kcups over (top side down) and placed them where I wanted them in the final product...I drew around the lid of each one.  I took scissors and cut a tad inside this line.   I made sure the kcup would fit each hole.  Once I had those like I wanted them, I used a compass and made the circles perfect (I did not have any die or punch the right size or I would have used that).  Then I made a bottom for the box using the same triangle on no holes.


I took a pizza box and cut some sides.  They started out at the 8.5 and 8 inch long that I "measured" before and were 2 inches tall. I wanted the sides 1.5 that is why I chose 2 inches. I took my scoring board and scored .25 inch on each side of the strip making a lip.  I glued the sides to the bottom part of the box.  I did not have to alter my 8.5x2 or 8x2 strips at all!

I mod podged a triangle to the bottom of the inside of the box.  Then I cut strips of paper slightly less than 1.5 inches and covered the inside sides of the box.

I covered the top of the box with a sheet of paper, leaving about .25 inch hanging off so I could tuck it under and make a nice finish.  I used mod podge to adhere paper.  Once that dried I cut slits in the circles so I could tuck the paper on the underside of each circle for a better finish. I did not take a photo of this as it was too messy.  Once the top side was dry I adhered it to the bottom with sides piece.

I then took strips of paper and mod podged them unto anywhere where raw cardboard  or a rough edge was showing.

This took me about 2 hours start to finish. 


01 March 2014

A thing that makes me go hummmmmmm

I am an avid reader.  I mean,  I read all the time.  I read on a tablet, on my phone, and paper materials.  When you are constantly reading on an electronic device you use your battery (duh)....this will cause you to have to plug in your device to charge.  Now, I read while my device is charging...here's the part I don't understand.  Why does my iphone and my tablet (Samsung Galaxy Tab) have the charging port on the bottom?  When you read you hold the book in your lap, into your stomach, standing so you can see the page better....this is impossible is a charging cord is stuck in your belly.  What happens to your cord from this?  Oh, the cord gets a short in it causing you to have to purchase a new one.

I get that they do this for the charging stations, but why can't the port be in the side and the device charge sideways?  All of them have rotating screens so you can still use it on the station. What did you say?  Why can't I read sideways? I can, but it messes up the book "page". Have you tried it?  It's all funky.

My solution to the problem is to always keep a paper book in my reading rotation so I can read paperwise while I am trying to charge.  

Just wondering and open to any of your opinions. 

Saturday afternoon book making

Tuesday night is a big evening for me.  Our local Community College is hosting an event where they are bringing in an author and letting him speak then sign autographs.  West Kentucky Community Technical College has done this before, but this is the first time I have longed to go.  It was almost a year ago that I read about the event and have counted down the days.

Who is coming to the little town of Paducah?  Why Jamie Ford.  You haven't heard of him?  Well, you need to google it right now.  Purchase the Hotel on the Corner of Bitter and Sweet first and you will be hooked.  There is a second novel entitled Songs of Willow Frost that I also recommend.

I discovered Hotel on the Corner of Bitter and Sweet not long after it was published.  I read it, reread it....well, I keep rereading it.  I have the ebook, but once I found out Jamie was coming to Paducah, I bought a paper copy as well.  I pre-purchased Songs of Willow Frost from BAM! and it was delivered to my house the day the book was released.  If you pre-purchased Songs, Jamie would email you a little "supplement" type/companion book written about one of the characters in Hotel on the Corner of Bitter and Sweet.  I read it when he emailed me, but decided that since I was going to meet him next week I would try to see if he would autograph my ebook too.


I printed the book in full form. It was rather large to bind, so I printed as a booklet.


I took a large sheet of mat board and cut me a couple of covers (8.5x6).  I covered each cover with one 12x12 scrapbook page (Bohemia by My Mind's Eye---the best paper pad EVER!!!).


 In the meantime I put together the booklet, scored the middle, and sewed the binding of the pages.  Once that was finished I inked the pages with Distress Ink by Tim Holtz (old paper and walnut stain).  I hot glued a ribbon to the "spine" of the booklet (gluing the booklet in the exact center of the ribbon).  Once the hot glue set up, I put a strip of hot glue on the inside edge of one of the covers and put the ribbon down on that side.  Once set I repeated the process with the other side of the ribbon and other cover.  The thickness of the book looks nice between the covers.  I mod podged the covers after adding some walnut stain ink to the edges.  I also mod podged the overleafs of the booklet to each cover giving it a finished look.

On the cover, I used Jamie's cover, but I ran out of color ink. I will reprint before Tuesday and mod podge the new photo onto the cover.

Not perfect but it's kind of like me...covered in flaws but handy.