Creative Gouache: A Beginner's Step-by-Step Guide to Creating Vibrant Paintings with Opaque Watercolor Mixed Media by Ruth Wilshaw
My rating: 5 of 5 stars
View all my reviews

Welcome to my altered journey through life. You never know if I will be into home improvements, knee deep in a good book, on an Alaskan cruise or just being silly. I hope this blog will give you tips, tricks, ideas and books to add to your TBR list. Thanks for stopping by.


 I have always wanted a stained glass window, but they are pricey and where was I even going to put one? Not, one was never on my radar for those reasons. Fast forward to when we moved into this house. We now live in the city limits, so houses are closer together. We have this lovely jacuzzi tub, and it has this window over it. We are very close to our neighbors, I mean they are great and all but do they really want to see us naked coming out of our tub? No! I didn't want to do curtains, why? Because I wanted a beach theme, the curtains are expensive and don't really fit a beach. So I looked at this as my chance to finally have that stained glass window that I had always wanted. I got some supplies together and made some sketches. First of all, I took painter's tape and taped off a 1-inch area around the edge of the window all around, this part would remain real glass so you could look out just a sliver.
 I then took Aleene's acrylic spray and sprayed the window fora good adhesive surface. It also made it look like the clear stained glass, kind of opaque cloudy. This stuff is a great thing to have in your craft room so you may already have this or a similar product.
 Then it was time to make the color parts of the glass. I used regular acrylic paint (because I have tons of this) and mixed it with a little clear Elmer's glue and dabbed it on the window within the lines designated for that color. TIP*** use a brush you don't love as you dab on the window you will ruin your brush.


 something I was looking for and was she ever right!! I knew instantly what I would do. Another friend of mine has an Americana entryway table and I wanted to do my own little version because my living room is all about America and travels. The table was a drop leaf table, one side worked perfectly, but the other not at all, I think that is ok because I am using it as an entryway table and not a regular table. I dreamed of painting the flag on one of the drop-downs and on the other side I planned to do another painting just in case I wanted to change the decor from Americana to something else. The first thing I did was de-gloss the table and sand it a bit.
  Next was adding a layer of white paint. My jar of white paint was rather old and while I was opening the jar it just shattered! I spilled paint all over my carpet and spent about 2 hours cleaning up all that mess. After that, I painted about 2 layers of white paint on the legs and then brown paint on the leaves and tabletop. Once all that was dry I free handed a flag. I wanted it rough looking like it was 70 or 80 years old. Once the flag was dry I dry brushed the whole thing in the same brown paint that I used for the top and I brushed the white legs in the brown too. On the other side, I freehanded a tree branch and a bird. Kind of like a cardinal in color, but a completely made-up bird. Once the bird and the tree were dry I did the same dry brush with brown on top too.


My first illustrated book is my life from "birthish" to present day.


Since I have gone about as far as I can go right now, I have started a second illustrated book. This one has the theme of Michelle's Musings (that may be the title). The "brand" is all about being random, FBSP (fly by the seat of pants) and completely off the wall, this book will be full of that type of stuff. I have started with a "Strange Alphabet". I call it that because each letter is an odd topic and not your typical "A stands for Apple" kind of book. Sometimes the topic makes sense and other times you may think I am a lunatic (wait, you may already think that of me). I am more willing to share this one with the world in it's entirety where I am keeping the other one for my kids.


 If you art journal I would so love to see some of your work. Remember there is no right way so if you don't journal, why don't you? This is a non-judging, don't show anyone unless you want area where you can be free, creative and honest. If you are struggling with an issue, draw or paint it! If you are excited about that promotion, draw it. If you love that song and want to create about it, do it!!! You can use as little or a much supplies as you want. You really only need to start with a pencil and a piece of paper...let your imagination take you from there.


 |
| The little places near Wasilla, I saw a flag there in a yard of a shopping plaza, no shopping plaza will be on the wall, but I put in the flag. There is a surprise in the sky, a close up will be provided below. |
 |
| Glacier Bay National Park and a tidewater glacier. I did Michelle's version of the Muir, which is shrinking terribly. |
 |
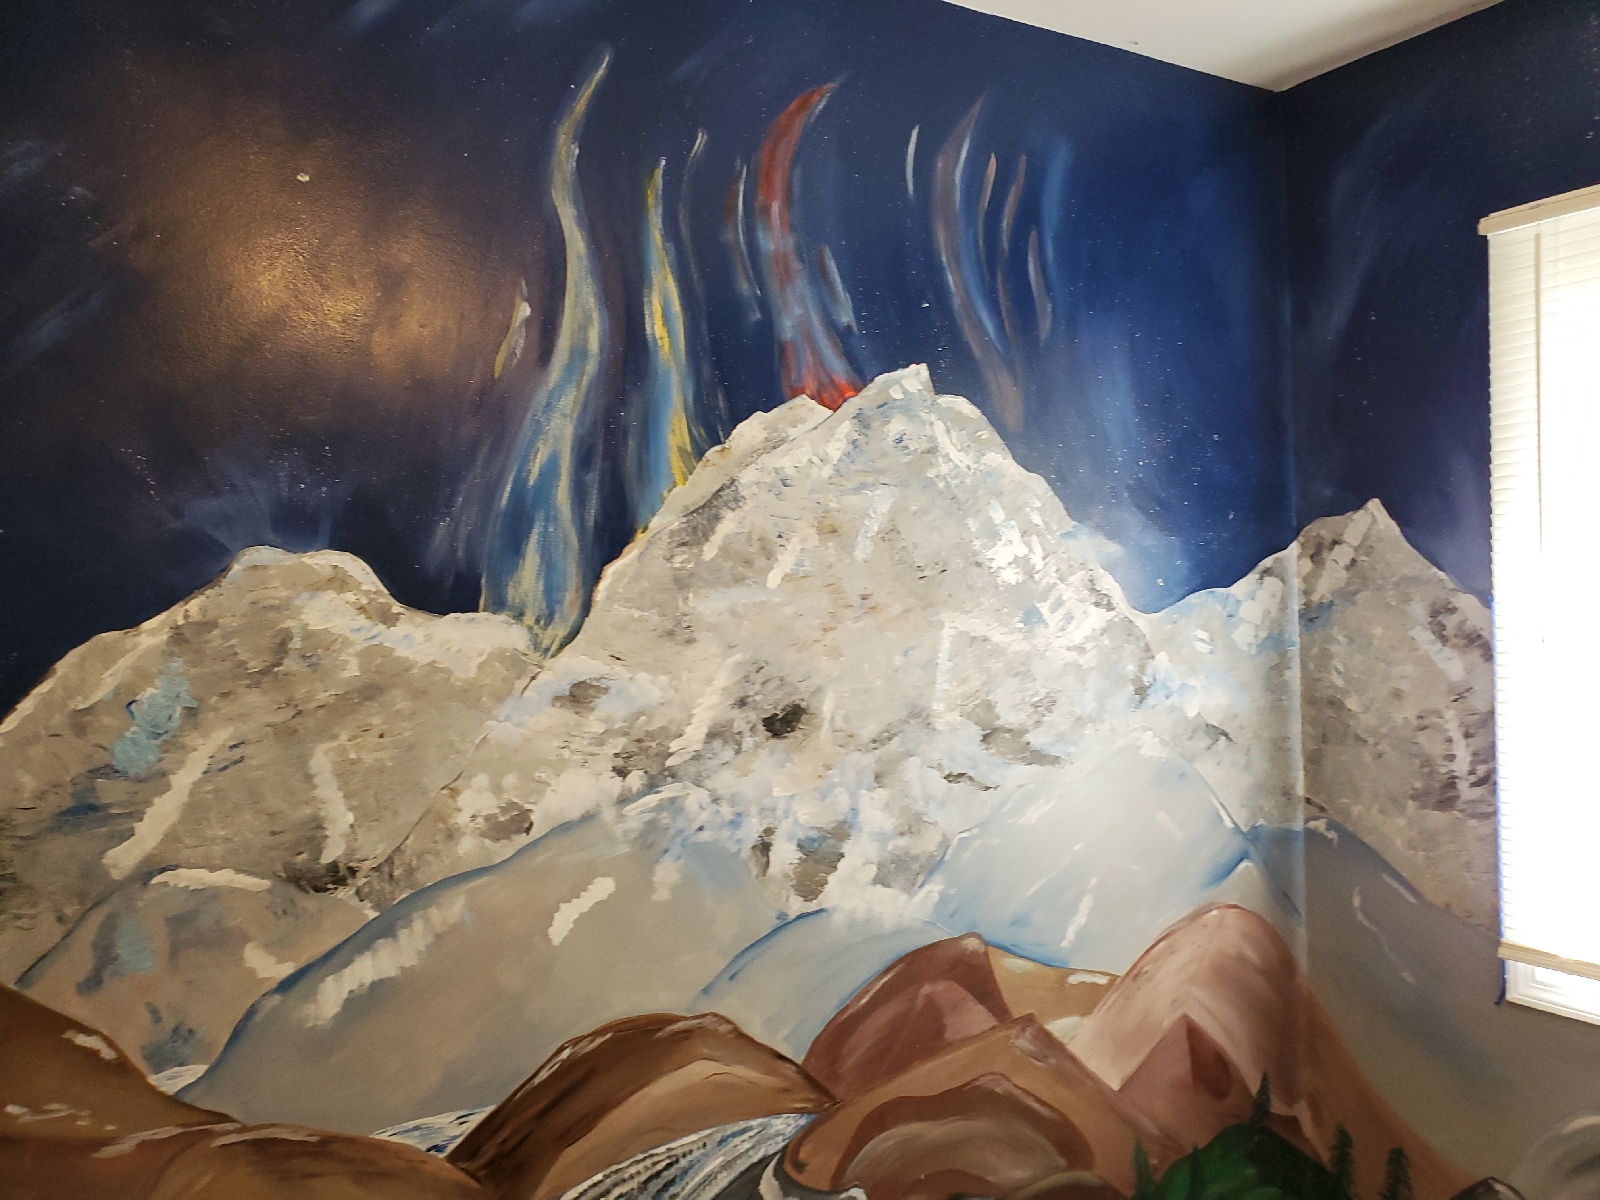
| Denali over the bed with the Northern Lights |
 |
| My version of the Ruth Glacier Denali National Park |

 |
| the flag in Wasilla |
 |
| A surprise over Glacier Bay |
 |
| Stephens Passage has a surprise on the tree |
 |
| A surprise over Wasilla |


 |
| My version of the Grand Pacific Glacier |