Free background from VintageMadeForYou
Showing posts with label diy. Show all posts

01 March 2014

Saturday afternoon book making

Tuesday night is a big evening for me.  Our local Community College is hosting an event where they are bringing in an author and letting him speak then sign autographs.  West Kentucky Community Technical College has done this before, but this is the first time I have longed to go.  It was almost a year ago that I read about the event and have counted down the days.

Who is coming to the little town of Paducah?  Why Jamie Ford.  You haven't heard of him?  Well, you need to google it right now.  Purchase the Hotel on the Corner of Bitter and Sweet first and you will be hooked.  There is a second novel entitled Songs of Willow Frost that I also recommend.

I discovered Hotel on the Corner of Bitter and Sweet not long after it was published.  I read it, reread it....well, I keep rereading it.  I have the ebook, but once I found out Jamie was coming to Paducah, I bought a paper copy as well.  I pre-purchased Songs of Willow Frost from BAM! and it was delivered to my house the day the book was released.  If you pre-purchased Songs, Jamie would email you a little "supplement" type/companion book written about one of the characters in Hotel on the Corner of Bitter and Sweet.  I read it when he emailed me, but decided that since I was going to meet him next week I would try to see if he would autograph my ebook too.


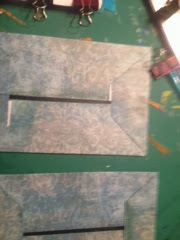
I printed the book in full form. It was rather large to bind, so I printed as a booklet.


I took a large sheet of mat board and cut me a couple of covers (8.5x6).  I covered each cover with one 12x12 scrapbook page (Bohemia by My Mind's Eye---the best paper pad EVER!!!).


 In the meantime I put together the booklet, scored the middle, and sewed the binding of the pages.  Once that was finished I inked the pages with Distress Ink by Tim Holtz (old paper and walnut stain).  I hot glued a ribbon to the "spine" of the booklet (gluing the booklet in the exact center of the ribbon).  Once the hot glue set up, I put a strip of hot glue on the inside edge of one of the covers and put the ribbon down on that side.  Once set I repeated the process with the other side of the ribbon and other cover.  The thickness of the book looks nice between the covers.  I mod podged the covers after adding some walnut stain ink to the edges.  I also mod podged the overleafs of the booklet to each cover giving it a finished look.

On the cover, I used Jamie's cover, but I ran out of color ink. I will reprint before Tuesday and mod podge the new photo onto the cover.

Not perfect but it's kind of like me...covered in flaws but handy.


07 September 2013

Who's dressing your form

It's been some time since I have been here. I apologize.  I have had many many things to do.  I have been creating just not sharing.  Don't worry, I will make up for the delay.

Some time ago I bought this paper mache' dress form at Michael's, why?  Because I am in LOVE with dress forms!  I have been looking for the die for my sizzix machine for some time, but that story is for another day.  Today all that matters is I bought this dress form.  The form was just that, a form.  It had no stand so I just sat it up on my paint shelf and stared at it.  Two weeks ago, I decided to get brave and make my own stand.  I found a sucker stick (it was an unused one like the ones you use for the melting chocolate) and some wire.  I fashioned the wire around the end of the stick to resemble the four little feet that support a dress form.


Once I shaped the wire like I wanted I had to paper mache' over my creation. I may have done this a little differently than most would, but I like mod podge so I used strips of newspaper and mod podge to build my stand.  Each strand of paper would get drenched in mod podge then wrapped around the stick/wire. I made a base at the top of the stand by layering many layers of paper strips.  My dress form will rest on this little knob.  Once the stand dried, I drilled a small hole with scissors into the bottom of the dress form.  I inserted it onto the stand which I had coated in Aleene's tacky glue.  I then added more drenched strips around the bottom of the form and the stand, just for more security.


I let it sit for a few days then I added coloring (with Distress inks and paint) to the body and trim that my mother-in-law made in the '60s.  After that dried, I painted the stand black. I was on the fence. I thought of embossing the stand with silver embossing powder, I may do that to the other dress form I have because I am CERTAIN I will be making a stand for that soon.

I wasn't sure what I wanted to do with it next and I made a gown for the form.  I did not like it so I ripped it off and decided to go with a tulle tutu.  I took a Tim Holtz pearl, a glass bead, and a rhinestone.  I wired them all together in a belt for the skirt.  I thought the rhinestone needed something else so I took it off and colored it with cranberry alcohol ink.  MUCH BETTER! A pearl necklace provided the finishing touch to the body.  I wish I could fashion some stilettos from newspaper and mod podge to go with this beauty.  


06 July 2013

Homemade stamp cleaner

I did not make up this recipe, but I have been using it for years and love it.  I wish I could credit the person that gave me the recipe. I met her at a CKC convention and I did not get her name :(   We were taking a class together and she shared it with me during the class.

I can tell you that I have tried it with Stazon inks, pigment inks, dye inks and I have had success with each one. I have not noticed anything amiss with my stamps either.

I make the recipe and pour some in a misting bottle to use during each stamp session.  I make up enough to also fill a glass Voss water bottle.  That way I never run out during a creative session.


2 Tablespoons of liquid glycerin (I found this in the cake aisle at Michael's)

1 Tablespoon of baby shampoo (I use a cheap version...this time I have a 2 in 1 shampoo)

8 oz Distilled water


If you have ever used a homemade cleaner I would LOVE to hear your results.


Update 2020:

I am still using this exclusively to clean my stamps.  I have never had any issues and still love the way it performs.  I have not bought stamp cleaner once since I met the lady at the CKC convention in 2011.  

23 June 2013

Homemade modeling paste

One of my favorite YouTube channels is Luvlee scrappin.  She has all kinds of homemade tricks and many tutorials on art items.  I like so many of her tutorials I can't even pick my favorite.

I did stumble across this one some time ago.  This one teaches you how to make your own modeling paste.  I put it in my favorites on YouTube because at the time I had modeling paste.  Yesterday I ran out and decided it was time to try Leeanne's recipes and make up a couple of batches.

You really should watch Luvleescrappin's tutorial.  It is detailed and she is entertaining.  Here is the link.......here.


Now that you have watched Leeanne do her magic, I will tell you that I followed her small batch recipes.  I made one with baby powder and one with baking soda.


I encourage you to make some and see which you like better.  So far I like the baking soda one the best, but I am going to keep trying them both until I am out of what I made up.  From there I intend to only make the favorite one.

Thanks Luvleescrappin! 


12 June 2013

Homemade anti static bag

I have wanted an anti-static bag for quite some time.  They are not that expensive, but I still hate to spend that money on something that I think I can make myself.

Today I have made three bags in an effort to see which formula would work best.  The formulas I tried were simple: baby powder, baby powder, and cornstarch and corn starch.

The bags were also very simple to produce. I took a jewelry polishing cloth and cut out three rectangles of fabric. I did not measure, but I would say that the rectangle was 2x5.  I stitched up the sides. I wanted to make sure they were secure so I used a row of straight stitching and then a zig-zag stitch.

I then labeled the top of the bags with a C (cornstarch), CB (corn starch/baby powder) and a B (baby powder).  I then filled the bags.  I used the same ratio for the mixed bag, 2 t of each.  The other bags, I did not measure.

Once the bags were filled, I closed the top of the bags using a row of straight stitches followed by the zig-zag stitch.

Had I been making the bags for "looks" I would have been more careful with my stitching and the overall look, but since this is just an experiment functionality was my only goal.  :)

I plan on using them each for a while and seeing which one I like best.  Have you ever tried any of these techniques?  I would be interested to see what works for you. 


21 April 2013

A crowning birthday

I absolutely LOVE to wear a crown for my birthday. I don't know why I do it...but I do.

For years I have worn cheap children's crowns, but this year, going on 41, I should probably wear a grownup crown.  I decided to make one that reflected who I am. A keepsake crown...that's HUGE!

I started by drawing out a pattern.  This proved to be a tad challenging, as I wanted two layers to the crown.  I had to match up the layers so that it all made sense. Therefore, I had to cut out each pattern and put them together to see if they worked.  Making the patterns took me about 2 hours of trial and error and (insert GASP here) MEASURING.

Once I got the pattern like I wanted it, I drew it on the back of a pizza box.  I used Jack's pizza 4 pack pizza box.  It worked out perfectly to fit the two layers onto one pizza box.  Then I cut it out.

I decided to decorate every single side of the crown.  The insides (the sides facing toward the inside of the crown) were made using pages from "Song of the Siren" and a sheet of K&Co paper.  I mod podged these papers to the crown then I let dry.  The next step was to trim the edges.

I did not take photos of the next stages...my hands were covered in mod podge and I was the only person awake so there was no way I could photograph these steps.

Once the inside was dry, I took K&Co polka dotted paper (Wild Saffron) paper and tore into long strips. I adhered with mod podge to the front of the inside layer.  I then took pink Bohemia paper by MME and glued in full to the small outer layer.  I mod podged both of the crown pieces.

The embellishments were made by making a  two 2x12 inch wide strips and 1x12 inch strip and using my scoring board I made rosettes.  I took Domestic Goddess paper by Graphic 45 (I simply LOVE their paper) and used for the main lady and the top lady on the left.  The lady below on the left is a 1920 stamp I have (I do not have a brand name).  I glued dream chipboard to the smaller rosette and the larger of the two ladies and glue to the larger rosette.   Added a dragonfly and some tulle.

All inks are by Tim Holtz. Glues are Aleene's and Mod Podge in matte.  Sparkles provided by Stickles (Tim Holtz), lace by 7 Gypsies.

This is going to be a great birthday!  Happy 41, Michelle


06 January 2013

Rustoleum Cabinet Transformations

Our house was built around 1967 and the cabinets in the home have never been repainted and frankly I don't think anything has ever been done to them since the day they were installed.  I was fed up!  Check out the before pictures and you will see exactly how bad the cabinets looked.  They also had another problem that you didn't see, if you closed them you would have to lift on the doors to make them fit.  The cabinets hung loose and were just plain pitiful.  


My first thing had to be to number the doors. Since they are custom made every door is a different size and I thought numbering them would be easier for me. I first labeled with masking tape and as I took down the door I wrote the number on the side of the door that does not show when hung.  For the top cabinets it was the top edge and the bottom it was the bottom edge. 

I then took off all the doors, cleaned the hinges (I was saving them) and filled every single hole where a door was attached to the cabinet base.  This step was long and messy, but my intention was to hang these doors as if the cabinet base was new and then I would have a tight fit with no sagging doors.  Then came the kit......

The first three photos are the before photos

I had enough left over to do our pantry cabinet.  The before is on the left, it was sponged a combo of our kitchen colors and the right is the after, looks nice doesn't it?  I am pleased with everything, the ease of use, the actual product, everything.


The bottom cabinets are finished, the top cabinet are in two different stages.  The part of the cabinets on the left is being transformed, the ones on the right are the original cabinet finish.
Look at the difference in finished and the old way
New hardware pulls in the look.  Hardware was $70 at Lowe's for 12 drawer pulls and 22 knobs
The finished project.  Next we got a new stove (not pictured) and I am working on a new curtain.  Counter tops will happen in the spring.


01 July 2012

I will wring you up by your neck

Today I made scarves! I had leftover fabric that needed to be purged from my craft closest and decided that scarves would be the best way to clean out that closet.  I first took two large rectangles of fabric, one in brown chiffon like and one a floral rayon blend.  I stitched them together to make one long rectangle.  Then I fold them in half right sides together and stitched up the long side.  I turned it right side out and stitched closed the bottom and bam an infinity scarf.  FAST and easy!


The next one took some more work.  First I started with 2 7 inch wide rectangles and strips of pink.  I stitched the pink up to make two long ruffles. I pinned those ruffles to the long sides of one of the black rectangles.  I then placed the other rectangle on top of this rectangle and pinned the ruffles in the inside.   I was making a tube full of ruffles.  I stitched closed the tube on the long sides.  Next, I turned it right side out.

And it looked like this. Each end had a selvage so I did not have to hem up the ends, but I did decide to use some black thread and stitch the ends closed.  I am very pleased with this one. 


Lastly, I was running out of fabric and just made two long black rectangles again. I took some leftover striped material and made ruffles from it.  I wanted a sloppy look so I did not serge the edges.  I layered two rolls of ruffles on each end of one rectangle and stitched in place with a zig-zag.  Then I made another tube using the last black rectangle and stitched that baby closed in all but a small area so I could turn it right sides out.  I slip stitched it closed. I like it!!!!


Little Suzi Homemaker????

Really?  I surely can't be talking about ME?  Nope, I am not, what I am talking about is the item that I made today.  Here is the story:

A few months ago I made vests for Trevor's drama club.  I kept the scraps.  They were not really big enough to do anything but I kept them anyway.  The remnants used today were 4 strips of red flowery fabric.  To this I added some white fabric that I got from my mother in law and I have literally had it for about 15 years.  To that I added some pieces cut from a red carpet party that we held for Hannah for a birthday party about 6 years ago.  As you can see from the main photo I made an apron.  I had wanted a nice one to wear when I have folks over for dinner, or when I just wanted to feel like Donna Reed.

This apron was made without a pattern, but I will try my best to walk you through it.  I have no measurements so I have measured the finished items.  I just sewed this up by sight.

All sizes are finished sizes:
Bib-12x13 (I just fashioned this to my size. I actually cut the fabric a couple of times before I started stitching. I cut 2 bibs.

Ruffles, since they were all from remnants, I just had to use what I had.  The bottom red ruffle is about 1.5 inches,  the bib ruffle is about .5 inches. The neck ties are actually made from the bib ruffle.  There was enough to use for the ties, then I took the rest and gathered it to use on the bib.

The skirt is about 24"x 40".  I gathered the top of it by using a very loose running stitch and hand gathering it.

First thing I did was take the gathered small ruffle (I gathered it first) and the ties and  sandwich them between the two bibs.  I stitched right sides together on 3 sides (the open side was the side that touches the waist).

Then I put the ruffle on the bottom of the skirt (it was gathered in the first steps.  I finished the edges by using a zig zag stitch.  I also stitched a small piece of the skirt material on top the (inside) to make the white thread not show up as much.

  The sides of the skirt were cut on the selvage so no need to hem that. 


The next step was to take the last piece of remnant and I fashioned a waistband from this.  There were 2 pieces and I stitched them together on the short side making a very long strip that was approx 2 inches wide and 59" long.  I folded it in half longways creating a 1"x59" strip.  Then I went in and folded 1/4 over on each edge just to finish the waistband.  Then I made a sandwich, waistband, skirt, bib, waistband.  I stitched it all together and bam I have an apron!

25 March 2012

Handmade paper flowers


I found this pattern on the internet (I wish I could remember where, if you know please tell me).  I wanted to show you how I put together the flowers.
Start out first with a flower template. 
I printed the template on a sheet of regular paper.  I think put that template on top of 2 sheets of cardstock.  I cut out the template and the cardstock at the same time.  This way I would have 3 flowers when I finished.
Next I took my Tim Holtz's distress inks (in Dusty Concord, Chipped Sapphire, Broken China, Mustard Seed, Spiced Marmalade, Fired Brick, Festive Berries, Evergreen Bough, Peeled Paint, and
Worn Lipstick).  I may have done this step backwards but I wanted the edges to be inked that is why I inked it this way. It was more difficult I won't lie but I like the way the edges look.  I inked both sides of each flower.


After I inked the flowers, I dropped drops of water on the flowers, and then I scrunched up the petals into flower type shapes.  This is sort of time consuming but I think it is totally worth it.  
After I scrunched the petals I took the heat gun to the whole flower.  When it was completed I rolled the flower starting at the widest point.  When I got to the small point (center) I tucked the end around the flower and used hot glue to hold in place.

The purple one after scrunching


Here comes the rolling

27 November 2011

I adore a pink scraf, especially when I make it!


So I had this great pink t-shirt.  Fit great, great color, was WELL made and in typical Michelle fashion, I washed it......WITH AN INK PEN!!!


Yes, the lovely shirt had ink on the back of it.  For a while, I wore it under a shirt because the front was fine.  Until that one day when I was sweating and I needed to take off the over the shirt.  I decided then and there that wearing it under something just was NOT going to work.  Next step?  To repurpose it.  I thought about it for a couple of weeks.  What did I want to do?  How did I want to do it?  etc...I decided that a scarf would best serve me. I wear scarves all the time (I am sort of like a Cullen in that fashion) and the pink color would be perfect to wear with a black or brown t-shirt.

I first made the shirt as flat as I could on the table and then cut off the hem.  The next step was to cut the midsection just under the armpit area.  That left me a tube and from this tube I just 1/2 (ish I don't measure) strips.


When I cut strips out of the entire tube I put all the strips together and pulled as hard as I could to stretch out the strips.   The t-shirt had two side seams so I would have to deal with them.  On one seam I made a band out of the t-shirt remnants.  I tied the strip around the seam, wrapped it and then tied again.  I tried to hide my tying inside the bulk of the strips.


On the other side, I put a flower that I made from the sleeves.  I did not come up with this design, this lady did.....it is brilliant!!!    http://gonetoearth.typepad.com/gonetoearth/2009/03/tutorial-fabric-flower-brooch.html

In the end, all that was left was this pile of scraps. I do intend to make a couple of flowers out of this stuff. 


In the end, I had very few scraps left, I made a bracelet, a flower and had 4 square left that I intend to stamp on and place on a scrapbook page.

Review: My Mama, Cass: A Memoir