Free background from VintageMadeForYou

15 July 2011

Paper flower (this one is messy)


This flower was not my creation.  Someone taught me how to do it.  Instructions are my own because I don't measure, I just free cut.


I start with drawing generic flower shapes onto the paper that I am going to use.  Then I cut them out.  As you can see, when I cut I usually take free reign and cut outside my lines or simply redo the whole thing.  That is why usually I just free cut. You will need flower shapes in varying sizes.  I used 3, large, medium and small.

Cut the middle out of the flower shapes.....and spritz with water.

While wet, curl the edges.


Cut out a heart, and a half of a heart, these will make up the center.

Ink your center if desired.  I ink everything!!!!!!!
 Ink all the edges of the layers and stack on top of each other.  Largest to smallest with the curved sides pointing down.

Roll the heart shape to resemble the center of a rose and put the 1/2 heart shape with it and roll it.  You may have to play with this to get it like you want it and don't be afraid to spritz as needed.  Set aside for a few minutes.


 Pick up your layers of flowers and insert the rolled middle that you made and place into the center of your layers.  If the paper is still wet, this is a great time to move it about in the shape that you desire.

Flower tutorial

I have decided that I am a flower making machine. I have shared some of my flowers with you...but today I discovered (after a couple of attempts) a new better and way prettier flower.  Actually TWO...one is super simple, the other a little harder but not much.


the two types of flowers


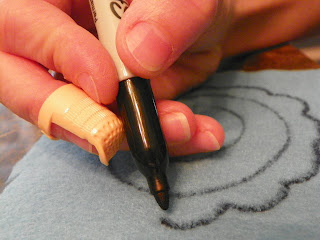
This on the outside of the swirl, I drew scallops (these will be your petals)...use a marker that matches so it won't show. I did black for instructional purposes.


Cut out the swirl.

Start rolling the flower from the outside of the swirl in.


My finished rose...I love it!!!

Back of the flower with the stitch and two more completed roses.
Flower #2:


I cut a very ugly rectangle of felt

folded it over on itself and stitched up the side.

I have a snake looking thing....

I grab the thread and start to gather the rectangle and now it makes a circle.

I moved the inside of the flower through the middle and underneath.  I stitched it in place.

A button found it's way to the center and I have a very simple tiny "who knows" what type of flower it could be.  Very cute on a card or page though.

04 July 2011

Forever and ever


Well, my parents anniversary is coming up (as I write this---as you read it, it is past). I decided a long time ago that I wanted to do something special for them. How many people do you know that make it 40 years? How many make it 40 years and still like each other, much less love each other?

Yes, to celebrate is no brainier. The thing is how to do it, how to make it special, how to make it not cost a fortune?

That is where I sit this day. I am trying to find someplace that is not too expensive, better yet free. I am trying to plan things that are "easyish" to make/do (this is a time problem).

My first step was to decide what I wanted. A meal at a restaurant or reception? The reception was my answer. A meal or reception food? reception food....Wait!!! Reception food. I want to have a wedding type of thing. I want them to proclaim their love for everyone. Being from poorish sort of families they never had a "proper" wedding. I want to give them that. If not a preacher ceremony, a re-dedication ceremony. With a proper reception.

The first stop was coloring (for me because I want to make the stuff).  I found a pad of paper at Hobby Lobby that very much fit my mothers' style.  Very country styled patterns, with blues, maroons, yellows, greens, and browns.  I think it was a delight.


The next part was to make the stuff. I got lucky and had a Cricut cartridge that made boxes.  I used 2 Cricut mats and about 70 sheets of cardstock, but I got all the favor boxes, all the centerpieces, and 2 journal type books done.  

I started work in January.  Yes, it takes quite some time to do all this.  I worked on it every Saturday until June 18, when it all was put together into the reception.


Now the reception was a bit of perfectness.  We had people attend that they had no idea about.  My dad did make me crazy the last week or so panicking about who was invited and who was not, but this is a time when he needs to learn TRUST.  It was lovely.  If you were invited and did not come, why then you missed out.


I think it turned out to be a great time.  Their song redeclaring their love for one another was just about the sweetest thing ever. 

03 July 2011

I feel fine

you know my name (look up the number)


Today I decided to have a scrapbook day of my own.  I was inspired because I am reading a book about the Beatles.  About  their creative process, about how they came from nothing and achieved it all  (at least in the music world).  I want to achieve so much in the creative world.  I want to be a scrapbook artist! One who gets paid for her designs and people talk about her designs as they do someone like Tim Holtz or Theresa Collins.

With this Beatles story in my mind, I thought...mmmmm they got famous with their songs, maybe I could use their songs.  Here is an attempt to use Beatles titles as the titles to my pages.  All of these pages were done on 3 July 2011.  The "you know my name (look up the number)" page was done for this week CR84FN challenge. 


Mr. Moonlight


02 July 2011

Mojo Monday 197

This week's card is a tribute to Love!  Some of the things I love...Purple, Technique Tuesday, flowers, swirls, and scrapbooking.

I made this with recollections purple card stock cut to 8x4. Fold that in half and you have the perfect 4x4 card.  Add a white backing (4.25x4.25), round the corners and use Stampin UP Eggplant Envy ink on the edges.  Cut a 3x3 square for the middle.  Round the corners and ink the edges with the same ink.  Use Stazon ink in black and the lovely "Love Makes the World Go Round" heart, and sentiments.  I took a white prima flower and used the eggplant envy ink and a watercolor brush to "paint" the white flower.  I rubbed the purple flower along the top of the eggplant, put it all together and BAM!!!  A sweet little card for someone I love....Maybe ME!!!!!


Just for fun I made the round one too!   Same sheet of purple cardstock, using the leftovers.  Using the Everyday Life stamps by Technique Tuesday. I turned the star upside down and used the eggplant to stamp my white paper.  Then I turned the star stamp over and using the stazon stamped the "correct" side of the stamp.  The white paper square is 3x3, the white square is 3.25x 3.25.

The flower is from prima and the leaves were hand cut,colored, and painted by ME.  Font is also by me.

My nook color

 Rooting my nook color was not a difficult thing.  There was a moment when I think that my heart stopped because I finished the rooting process and the thing would not come on.  Patience my friend, about 4 minutes later the little droid dude pops up and I have my very own rooted nook.

I have lived with it for about a month now...my opinion on it??? Well, I agree with those that told me that it would be one of the greatest things ever.  I now run Honeycomb and have a full-fledged Android tablet.  I can use my Kindle, Nook, Laputa, Amazon app store, Words with friends and the all-important ANDROID market!!!!  I recently installed the library's overdrive console so now I am able to use even more books.  My reading has increased too.  I was sick and tired of reading books under the cover with a flashlight by my cheek.  Now I simply pull the covers over my head and read until my battery dies.

Battery life?  The battery life is not as long as it would be had I kept it a Nook Color.  Mainly because I am using more apps, more internet, and well, just more.  If you have more, you use more.

Touchscreen?  Sometimes it is glitchy but it is not a big deal.  I believe it is more the ADW launcher than the tablet itself that is glitchy.


The specs?  I am running Android 2.3.3  Cyanogen Mod with the Iron Man theme background. It is actually the Iron man Droid.  The rest is just mumbo jumbo that you probably don't care about.


The result? Happiness...it performs in the exact manner that I dreamed it would.  I have a full-fledged Android tablet that cost me 194.00  PERFECTION!

01 July 2011

Creating Keepsake July 1, 2011 challenge

One hour is hard to do when you hand sew. I am trying hard.  My hand is aching so I have to take a break.  I am uploading the before product here so that you can see what it entails.  The after will follow very soon.


Here is the completed project. I got finished at 12:29 pm central time and began at 11:02am.  Whew...I like it. Thank you this was fun!

Review: The Unbecoming of Margaret Wolf