


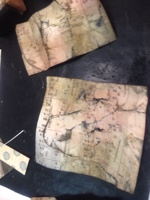
I measured everything first. I didn't like the way it was measuring so I went back to the technique I use all the time.....eyeballing. My eyeballing skills are WAY better than my measuring skills. I must say they were much more accurate as well.
After I eyeballed the paper size and cut the papers to that size. I inked the pieces of paper with Walnut Stain, Worn Lipstick and Black Soot. All by Tim Holtz (Distress Inks). Then I misted with water.

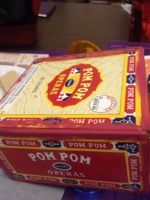
Gouache dries quickly, so I was ready for the next step in just a minute or so. I used Aleene's tacky glue, because frankly I think it is the best. I put the glue onto the box and paper. I wanted a good hold. then I started putting it on. I am one of those folks that could are less if I get glue/paint/ink on my hands so I really rubbed the paper into the cracks and the edges and even molded the paper to fit the corners. My hands were a wreck, but the effect is well worth it. Give it a try. You can always clean up with soap and water.

Once the paper was adhered I added ribbon onto the edges for one more dimension. The box is starting to take shape. I knew that I could not finish it here at Trace Creek, because I would need some bling....but I did try to get as much decoration on the box as possible. Here is what the box looked like when I left Trace Creek.

Now, once I got home I had to add to the box......I misted the box with Michelle's Musings Sterling Silver shimmer paint and allowed that to dry. I did not want to use a heat gun because I did not want to risk damaging the box. The next step was to paint the box with modge podge. I used a matte finish, this will provide a more durable surface...if there is one thing I hate it is when someone makes something and doesn't protect it so it lasts. All that hard work gets bent up/dirtied up and falls apart. It's a shame in the fact that the work goes down the drain and that you lost the great object you made or made for someone. Protect your work!!!!
Here is the finished product....enjoy GET CREATIVE!!! What do you have lying around the house that you can repurpose?


Beautiful! I love this!
ReplyDelete